Reviewed by Editor: Jack Allison
I’m using the ZTE MF190 modem (ebay), but the instructions are valid also for many other tested cellular dongles. I would propose to use the tested ones at your initial experiments, as the problems you may run into (extreme power consumption, stability, heat pollution, support-ability and connectivity issues etc.) may be unpredictable and are on your own risk.
ZTE MF190 led-indicator legend:
– Red – turned On, but not registered to no cellular network
– Green – registered to GSM, GPRS, EDGE, UMTS, HSDPA,
– Green Twinkling – connected to GSM, GPRS, EDGE, UMTS, HSDPA
Note: Although you will see three additional logical USB devices after plugging the dongle into a USB slot, ONLY the third logical USB device is useful for data communication (ttyUSB2 in case of ttyUSB0/1/2), when we talking about referencing this modem in your scripts. This is relevant only to the ZTE MF190 only. For other modems this may be different.
Electrical Setup
You will likely be able to proceed with the steps below without this additional recommendation. However, you may run into a stability issues with your cellular data channel unless you find some way to provide additional spare power to your USB-dongle.
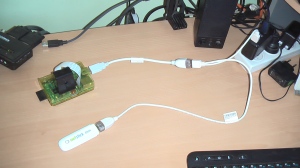
The way I would propose is a minimalistic one – usage of USB Y-cable with 2 male a 1 female connectors. At the picture below you can see a single-cable solution.
This one USB Y-cable carries out dual function:
– powering your RPi board
– giving that additional power to your cellular dongle that it needs sometimes and that RPi’s pretty WEAK power regulator cannot provide.
That is apparent, that in case of such a solution, at least one 220V to 5V power-adapter is needed with an option to plug at least 1 USB device into it. The adapters with ability to provide 2A of current are preferable.
Note: Be attentive to connect that USB Y-cable correctly. There is one male connector at the thick end of the cable. This end is for data and power transmission and is to be connected to RPi’s USB slot. Data comes from the female connector’s side of the cable where the cellular dongle should be connected. The remaining male connector at the thin end of the cable is designed to transmit power ONLY and if you connect this one into the 220Vto 5V power converter everything starts to power-up and should work in stable manner from electrical point of view.
Step-By-Step
- Plug the cellular dongle into RPi’s USB slot
- Install relevant Python packages
sudo apt-get -y install ppp eject wvdial usb-modeswitch - Use auto-detection command for the case the modem was not detected. This command creates default /etc/wvdial.con wvdialconf
- Edit/Create /etc/wvdial.conf according to your SIM-card’s Access Point Name (APN). See the example for ZTE MF190. This example is achieved by editing of default version of wvdial.conf created at the earler steps:
[Dialer Defaults]
Init1 = ATZ
Init2 = ATQ0 V1 E1 S0=0 &C1 &D2 +FCLASS=0
Modem Type = Analog Modem
; Phone = <Target Phone Number>
ISDN = 0
; Password = <Your Password>
; Username = <Your Login Name>
Modem = /dev/ttyUSB1
Baud = 9600
[Dialer check]
Phone = *99#
Init3= AT+CPIN=?
Init4= AT+CPIN?
Init5= AT+CFUN=?
Init6= AT+CFUN?
[Dialer youphone]
Init1 = ATH
Init2 = ATE1
Init3 = AT+CGDCONT=1,”IP”,”data.youphone.co.il”
Modem = /dev/ttyUSB2
Modem Type = Analog Modem
Baud = 9600
;Carrier Check = no
ISDN = 0
Dial Command = ATD
Phone = *99#
APN = data.youphone.co.il
Username = youphone3G
Password = ” “
Stupid mode = yes
New PPPD = yes
;AutoDNS = yes
Auto Reconnect = on
- use sudo to put this configuration to the /etc
sudo cp /<your_folder>/wvdial.conf /etc/wvdial.conf - Allow access to pppd directories
sudo chown root:dip /usr/sbin/pppd
sudo chmod 7777 /usr/sbin/pppd
sudo chmod 777 /etc/ppp/pap-secrets
sudo chmod 777 /etc/ppp/chap-secrets
sudo chmod 777 /etc/ppp/peers
- To dial, use sudo wvdial <Dialer_name>, where <Dialer_name> is form /etc/wvdial.conf. For example:
sudo wvdial youphone
- If you want to initialize your cellular modem during the RPi boot use the same command ending by ‘&’ at ~/.bashrc. This will run the command in background. The command ‘wvdial’ is blocking command – it doesn’t allow the shell to continue to other command, no matter what the execution result is. While this is fine when you are working at the terminal window and you want to see the log messages at the terminal’s window, this becomes a problem for an auto-start shell-script. The usage example:
sudo wvdial youphone &


Pingback: Raspberry Pi Experiment 02: PiCam video streaming through cellular network 3G/GSM | My Hobby of 'Making'
Pingback: Raspberry Pi Experiment 03: Streaming using HTTP | My Hobby of 'Making'